Replacing Boat Propeller Shaft Seals might sound like a technical chore, but it’s one of the most crucial maintenance steps every boater should understand. A properly functioning shaft seal keeps your vessel safe from leaks, corrosion, and engine damage, ensuring that every voyage is smooth and worry-free. When these seals wear out or fail, they can cause serious problems, from increased friction to water intrusion that harms your drivetrain. That’s why learning how to replace boat propeller shaft seals correctly not only protects your boat’s performance but also extends its lifespan.
Whether you own a luxury yacht or a fishing vessel, understanding boat propeller shaft seal replacement will save you time and money in the long run. In this guide, we’ll explore step-by-step instructions, essential safety tips, and expert insights for selecting the best boat shaft seals tailored to your specific needs. You’ll also learn how to identify a boat shaft seal leak, the ideal boat prop shaft seal size, and when to upgrade to advanced boat dripless shaft seals. Let’s dive into the process that keeps your engine dry and your sailing adventures flawless.
Why Boat Propeller Shaft Seals Matter
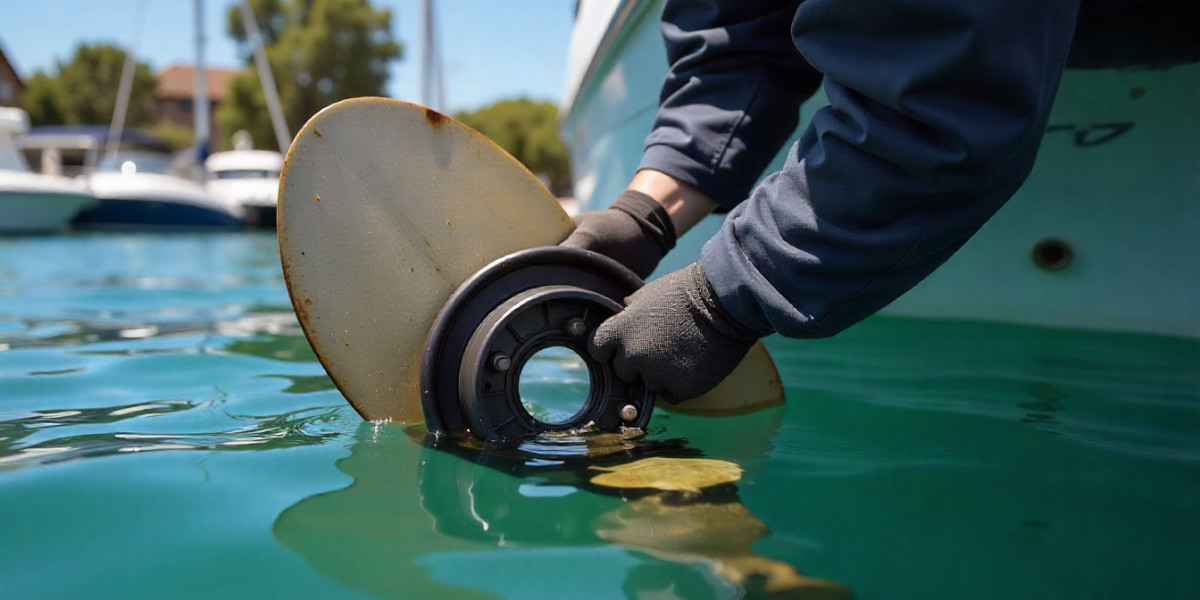
Boat Propeller Shaft Seals are designed to keep seawater from entering your hull where the propeller shaft exits the boat. When a seal begins to wear, it can compromise the safety of your engine and the overall efficiency of your boat. Reliable sealing systems ensure smooth rotation of the shaft while keeping your bilge dry, essential for performance and safety.
High-quality yacht shaft seals or boat drive shaft seals also reduce drag and improve fuel efficiency. Neglecting a failing seal may lead to expensive engine repairs, so replacing them at the first sign of wear is a smart preventive move.
Signs You Need a Boat Propeller Shaft Seal Replacement
A few warning signs can tell you it’s time to replace your boat propeller shaft seals. Persistent dripping or water seepage around the shaft is the most obvious. If you notice that your boat shaft seal is leaking when the engine is running, it’s time for inspection.
Unusual vibration, rattling, or increased engine noise can also indicate that your boat prop shaft seals have worn out. In such cases, immediate replacement can prevent water ingress and save you from costly downtime.
Tools and Materials You’ll Need
Before beginning the boat propeller shaft seal replacement, make sure you have the right tools at hand. You’ll need an adjustable wrench, marine-grade grease, a screwdriver set, and replacement seals. Always verify that the boat prop shaft seal size matches your shaft’s diameter; even a slight mismatch can lead to leaks or poor alignment.
Choosing the best boat prop shaft seal ensures long-lasting performance. Look for seals made from stainless steel and high-tensile rubber, as they resist corrosion and deliver superior sealing in both freshwater and saltwater conditions.
Step-by-Step Guide to Replacing Boat Propeller Shaft Seals
1. Preparation and Safety Check
Start by disconnecting the battery and ensuring your vessel is stable on dry dock or a lift. This is critical to avoid accidents during boat propeller shaft seal replacement. Once the area is dry, locate the old seal housing near the stern tube and clean it thoroughly.
Inspect for signs of corrosion or residue. If there’s significant wear, replace the housing along with the seal. Always have a backup boat shaft seal on hand in case one gets damaged during installation.
2. Removing the Old Seal
Loosen the clamp or collar securing the old seal to the shaft. Gently slide it off without scratching the metal surface. Take note of the direction in which the old seal was installed; this will guide you when fitting the new one.
Wipe the shaft clean and inspect it for pitting or grooves. If the shaft is damaged, even the best boat shaft seals won’t perform properly. Smooth it with fine emery cloth before proceeding.
3. Installing the New Seal
Apply a thin layer of marine grease to the new boat propeller shaft seals. Carefully slide it into position, ensuring the lip faces the correct direction to prevent water intrusion. Tighten the clamps evenly to avoid misalignment.
Modern boat dripless shaft seals often feature a water-lubricated system that prevents friction and overheating. If you’re installing one, follow the manufacturer’s alignment instructions precisely to ensure proper operation.
4. Final Checks and Testing
Once installed, rotate the propeller shaft manually to confirm it moves freely. Reconnect your battery and run the engine at idle. Observe any drips or unusual noises. If water still seeps in, recheck the alignment or retighten the clamps slightly.
A proper boat drive shaft seal should remain cool and dry during operation. If overheating occurs, inspect the water-cooling system or vent line to ensure proper flow.
Choosing the Right Boat Shaft Seal
Selecting the right boat propeller shaft seals depends on your vessel type, propulsion system, and sailing conditions. For high-speed yachts, yacht shaft seals with precision-machined housings and self-aligning bearings deliver the best performance.
If you sail in saltwater, corrosion resistance becomes a top priority. In that case, opt for boat dripless shaft seals or a hybrid seal with a graphite face. They are among the best boat shaft seals for long-term durability and zero-drip performance.
Common Mistakes to Avoid
One of the most frequent errors in boat propeller shaft seal replacement is reusing old clamps or hoses. This can lead to uneven pressure and leaks. Always replace them along with the seal itself.
Another mistake is overlooking the boat prop shaft seal size. Even a millimeter off can cause misalignment and compromise sealing efficiency. Double-check all measurements before installation for a secure fit.
Maintaining Your New Shaft Seal
Maintenance plays a key role in extending the lifespan of your boat propeller shaft seals. Inspect them every season for signs of wear or corrosion. Clean the seal and surrounding components regularly to prevent debris buildup.
For vessels that stay in the water year-round, schedule a professional inspection annually. A marine technician can test your boat drive shaft seal under load conditions and catch minor issues before they escalate.
Conclusion
Your boat’s performance depends on the health of its propeller shaft system. Learning how to replace Boat Propeller Shaft Seals correctly is essential for preventing leaks, maintaining smooth propulsion, and safeguarding your engine. Whether you prefer boat dripless shaft seals, yacht shaft seals, or the best boat prop shaft seal available, always prioritize quality materials and precise installation.
If you notice your boat shaft seal leaking, don’t wait. Early replacement can save you thousands in repairs and keep your boating season stress-free. Take the time to inspect, replace, and protect, because a well-sealed shaft means a safer, smoother sail.
FAQs
1. How often should I replace my boat propeller shaft seals?
Typically, boat propeller shaft seals last between 5 to 7 years, depending on usage, maintenance, and water conditions. Annual inspections are recommended.
2. What causes boat shaft seals to leak?
Common causes include worn-out lips, corrosion, misalignment, or improper installation. Using the best boat shaft seals reduces these risks.
3. Are dripless shaft seals better than traditional ones?
Yes. Boat dripless shaft seals offer leak-free operation and require less maintenance compared to traditional packing glands.
4. Can I replace boat propeller shaft seals myself?
Yes, but it requires basic mechanical knowledge and precision. Always follow proper safety and alignment procedures.
5. How do I know the right size for my propeller shaft seal?
Measure the shaft diameter and stern tube outer diameter to find the correct boat prop shaft seal size for your vessel. Using the wrong size can cause leaks or vibrations.